Friday, October 25, 2013

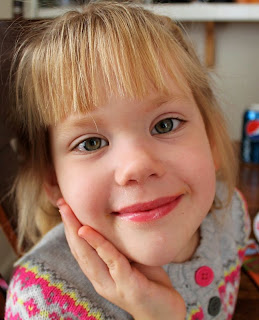
Bekah is Seven!!


My Dearest, Sweetest Girl,
These last seven years of my life have been such a blessing because I shared them with you.  I prayed for you and dreamed about you.  When I knew that you were coming into my life, I was super excited.  You arrived on October 15, 2006 at 11:16 am.  Daddy and I couldn't stop smiling and looking at your beautiful face.  Now you are ever so much more than your 6 lbs 6 oz you were on your first birthday.  It is wonderful to see you growing up and doing new things everyday.


Bekah, you are so full of life and smiles and sunshine.  You are a sweet girl and I love you so much!  This last year has been a great one.  You have learned how to read and you love it.  It is so fun to cuddle next to you on the couch and have you read stories to us.  Each day you are writing more and more.  I enjoy reading the little notes that you write to me and everyone else.  You love to color intricate patterns with lots of colors.  Chocolate and ice cream are your favorite things to eat (and you would enjoy them every day if you could.)  I am so grateful for all the time that I get to spend with you:  time playing at the park, cooking with you, reading to you and every other moment I have.  They are precious moments and I thank God each day that I get a chance to spend them with you.  
You are loved and will be forever.


We had a fun time celebrating your birthday. 
 It was a super fun day and I'm glad we all celebrated together.


                                                  Happy Birthday, my sweet Bekah!!!


Monday, October 14, 2013

Hannah's 5 Years Old


My sweet, darling Hannah, 

I so love you.  You are my little cuddle bug.

  Every day you bring a smile to my face and joy to my heart. 

 When I come home from work, you run into my arms screaming, "Mommy!  Mommy!  I missed you!"  You cover me with kisses and hug me till I can't breathe. 

 I am so fortunate to have you in my life. 

 The last five years of my life would not have been nearly as wonderful and exciting without you here by my side.  


Today you celebrated with all the heart that you have. 

 Daddy took you out for donuts and you got to pick two of them.  After playing your new game of Hissss with daddy and playing on the IPad, mommy and you got to make dollies with your new craft.  Then we went to the dollar store and you picked out color changing froggies and salamanders, a loud horn and bubbles.  After a lunch of crackers and cream cheese and fruit, we danced in the sunshine and blew bubbles.  We took a nap and snuggled.  After nap time daddy and you got to read in the hammock, you and Bekah painted with side walk chalk and we had dinner.  


Dinner was grilled cheese, jello and yogurt.  Hannah's request.


The favorite part of her day was opening her presents.  I loved how every present she opened was super exciting.  She would hug it to her chest and tell me how much she loved it.


Hannah loved her new sheets.  They look so cute on her bed.  Night, night-my darling girl!!


Tuesday, October 01, 2013

DIY Wooden Signs: Rustic Flag


So I have pinned so many great signs and things I want to make on pinterest.  I wanted to make something great for my house.  When I see things like this in stores, I won't buy them because I know I can make it.  And then I don't.  Until now.  

My sister is actually the inspiration for all that I am making.  She made some wooden signs for her house and I begged her to make me one as well.  When I visited her a few months ago, she made one of the signs with me that I wanted.  I headed home, wanting to do it myself.  

My friend and I drove all around Sonoma county looking for old fence boards that we could have.  I finally found one house with a ton of broken up fences next to their house.  I asked the family for some of the wood.  This was their firewood, so the husband didn't really want to give it to me.  I asked for just a few pieces of fence and promised to make her a sign out of part of it.  She graciously gave me four parts of the fence.  (Don't worry, they still had lots for their fireplace)

After the wood sat all summer, I finally got around to making something out of it.  

My husband showed my friends and I how to use a chop saw safely.  Yeah, we managed to cut what we wanted and had all fingers intact.


We took a hammer and chisel to the wood to help "age" the wood a bit more.  This was fun!!  


Making our signs a bit more weathered and beautiful. (to us.  My husband just doesn't get this)


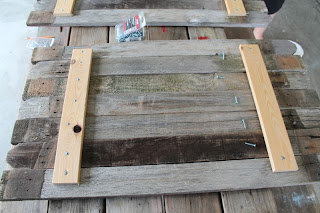
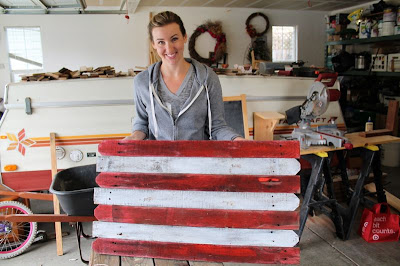
 I had pinned this Rustic Flag Sign awhile ago and both my friend and I wanted to make it.  So we watered down some paint (making it look weathered and rustic, right?) and carefully painted red and white boards.  We painted them first, assembled them, screwed them together and had a cool looking sign.


All assembled and ready to add the star.


I put two screws in each of the wooden boards. 
 Then I put a wire between them to hang up my sign.


I couldn't find a good start template on line,
 so I took a star off of my fence and traced it onto my sign.


I used little nails and a very manly hammer (I hope to get a cute pink one someday) to make a star design on the flag.


I made each of the nail about a centimeter apart.  In retrospect, I would have left them a bit longer and made sure they weren't aimed in at all.  It is harder to get the string wrapped and staying put when they are short and not straight.


Tie the string around one of the nails.  Leave a long piece at the end.  It will make it easier to tie off at the end.  I left mine way too short and it was harder to do.


We used a very thin yarn to make our star.  I wrapped the outline of the star.  Each time I changed direction, I wrapped the yarn around the nail once and then kept going.  I am going to add a few drops of glue to the outside of the star.  This will keep it in place even if a little child's fingers find this sign.


All ready to tie it off.  I tied the end of the string to the beginning tail of the string I left.